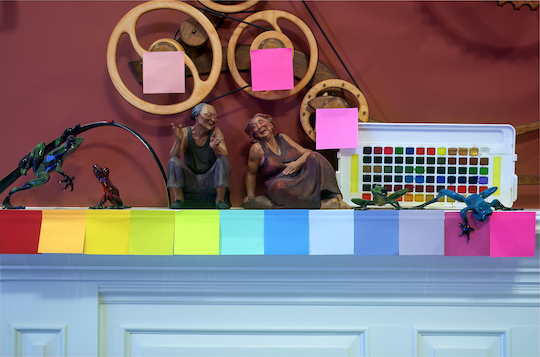
Color photography with the Leica M10 Monochrom camera (M10M) by Onasj (see all previous posts by Onasj):
I just took one of the most color-accurate photos I’ve ever taken indoors.
I took it with the M10 Monochrom.
The result blew me away—I was expecting the experiment to work, but not to exceed the color accuracy of most of the digital cameras I’ve used in the past. Perhaps only the Phase One IQ3 Trichromatic output colors that were close in accuracy to these (but the M10M here was still better).
The color accuracy was far better than that of my M10P using the same lens. The M10P has always rendered the color of this room’s walls far too yellow, resulting in apricot walls rather than the actual brick-colored walls.
You can probably already guess what I did (a centuries-old technique, in fact): I shot the same image three times, each time through a red, green, or blue color filter, then used the resulting M10M images to serve as the red, green, or blue channels of the full-color image. Voila, a 41 MP full-color image from your M10 Monochrom. The quality is outstanding since there’s no Bayer CFA, no demosaicing, no anti-aliasing filter, and 41 MP of resolution.
Methodology:
1) Get red, green, and blue color filters. To get the most accurate colors, I recommend using BLUE #47B, GREEN #61, and RED #29 filters. They don’t let through as much light as broader-bandpass filters such as BLUE #47, GREEN #58, and RED #25 filters, but because they are so narrow-pass in only allowing a narrow range of wavelengths of light through, the resulting color accuracy of the composite image is better. Moreover, the M10M is amazing at high-ISO photography, so photons probably aren’t going to be in short supply. Tiffen sells high-quality filters in all of these colors for not much cost (I purchased mine for about $10-$20 each). Best to get them all in one larger size, then buy step-down rings ($3 each) to adapt them to fit your lenses.
2) Pick a stationary subject. Any movement between captures will show up as the world’s worst chromatic aberration, so still subjects are important unless you want the psychedelic color ghosting effect (which can be artistic)
3) Set up your M10M on a sturdy tripod and frame and focus as usual.
4) To correct for differences in light transmission between the three filters, I let the camera and computer do all the work. Set your ISO as you wish, and use auto shutter speed. Put on the green filter and capture a raw file. Replace the green filter with the red one and capture. Finally, replace the red filter with the blue filter and capture. The order isn’t critical, though one small advantage of starting with green is that its transmission level is intermediate between the red filter and the blue filter for most scenes, so you can get an easier sense of proper exposure from the green-filtered shot.
5) Label the three raw files RED/GREEN/BLUE and adjust their exposure, contrast, etc. I simply used command-L (auto-adjust) on each photo individually in Capture One 20 and the results were excellent. Export as JPG files.
6) In photoshop, open all three files and paste two of them as layers into the third file, so now you have one Photoshop image with three layers. In the Edit menu, auto-align layers to minimize any tripod shifting that may have occurred between filter changes and shots. Make sure the image is in RGB mode (if not, switch to RGB mode).
7) Click on the TOP layer of the stack of aligned layers in the Layers tab. Select All the entire image of the TOP layer, and Copy the entire image of the TOP layer to the clipboard. Then go to the Channels tab, select the color channel that corresponds to the top layer’s filter (green, for example, if that was your top layer), and paste the image into that color channel.
8) Next, click on the middle layer in the Layers tab, Select All the entire image (let’s assume it’s the red-filtered image), Copy, select the TOP layer in the Layers tab, click the Channels tab, and Paste into the TOP layer’s corresponding channel (the red channel, in this example).
9) Finally, click on the bottom layer in the Layers tab. Select All the entire image (the blue-filtered image in this example), Copy, and Paste it into the TOP layer’s remaining (blue) channel.
10) Now be sure all RGB channels are visible in your Channels tab. Voila, your 41 MP image should be in spectacular full-color. Merge Visible to ditch the now-unnecessary middle and bottom layers, edit to your taste, and Save.
Example attached – the full resolution photo are available here. You can download the final result here (M10M, ISO 100, 50 lux at f/5.6, auto shutter speed) here.


